DECLARE @SQLServiceRestartDateTime AS VARCHAR(50),
		@ServerRestartDateTime AS VARCHAR(50)

SELECT @SQLServiceRestartDateTime = create_date FROM sys.databases WHERE database_id=2
SELECT @ServerRestartDateTime = CAST(DATEADD(SECOND, (ms_ticks/1000) * -1, GETDATE()) AS datetime) FROM sys.dm_os_sys_info

SELECT @SQLServiceRestartDateTime AS [SQL Service Start DateTime], @ServerRestartDateTime AS [Server Start DateTime]


Wednesday, May 25, 2022
T-SQL to find Server and SQL restart date time
This script comes handy when you would like to find out the Server and SQL services restart times.
Friday, May 20, 2022
T-SQL to find Backup or Restore Progress
Here is a script that comes handy while performing a huge database Backup or Restore. This script provides the details on the progress of the Backup or Restore operation including the estimated finish time.
SELECT
   session_id AS SPID, command AS [Command], a.text AS Query, start_time AS [Start Time],
   percent_complete AS [Percent Complete],
   dateadd(second,estimated_completion_time/1000, getdate()) AS [Estimated Completion Time]
FROM sys.dm_exec_requests r
   CROSS APPLY sys.dm_exec_sql_text(r.sql_handle) a
WHERE r.command like 'BACKUP%' OR r.command like 'RESTORE%')
Monday, May 16, 2022
T-SQL to find Navigation path in CMS
In large enterprises there will be huge number of SQL servers which will be registered within a Central Management Server (CMS) and times it may become difficult to find out where the server is registered atleast for new team members in the Huge pile of servers and folder structure. This query give you the path where the specified servers is registered within the CMS.
DECLARE @ServerName nvarchar(50)
SET @ServerName='SQL01';

WITH CMSCTE
AS
(
--Anchor
SELECT server_group_id, name, description, parent_id, 1 AS [Level], CAST((name) AS VARCHAR(MAX)) AS CMSPath
FROM msdb.dbo.sysmanagement_shared_server_groups AS A
WHERE parent_id IS NULL
UNION ALL
--Recursive Member
SELECT B.server_group_id, B.name, B.description, B.parent_id, C.[level] + 1 AS [Level], CAST((C.CMSPath + '->' + B.Name) AS VARCHAR(MAX)) AS CMSPath
FROM msdb.dbo.sysmanagement_shared_server_groups AS B
JOIN CMSCTE AS C
ON B.parent_id = C.server_group_id
)

SELECT TOP 1 CMSPath AS 'Path in CMS' , B.name as 'Server Name', B.description AS 'Server Description', A.name AS 'Group Name', A.description AS 'Group Description'
FROM CMSCTE AS A
INNER JOIN msdb.dbo.sysmanagement_shared_registered_servers AS B
ON A.server_group_id=B.server_group_id
WHERE B.name = @ServerName
ORDER BY [Level] DESC
Friday, August 17, 2018
Tips to Move SQL Server Database from One Server to Another - SQL Tutorial by Rajan Singh
Leading organizations always look to find different solutions for high-performance data replication and secure storage environment. One such step is to move SQL Server database from one server to its updated version. In fact, when you migrate SQL server database, it provides an opportunity to scale the organizations data ecosystem efficiently at an optimum cost.
Why should you migrate SQL server database from one server to another?
Why should you migrate SQL server database from one server to another?
- Advancement in Technology: Technology advancement may be a buzzword of today but it is essential to be up-to-date when it refers to Tech-world and to stay ahead, organizations need to accommodate the innovative style of Business Intelligence and ensure agility and higher productivity. Moving database from old SQL version to the latest and advanced technology provides users with an edge over the competition.
- Reduce Cost: Moving SQL server database may be time taking and expensive initially, although the costs are lowered significantly in the long run
- Achieve higher ROI: One of the significant reasons to switch from a lower version to a higher version or from a different database to SQL server database is to achieve a higher rate of interest on investments.
- Consolidate data: Sometimes, data is scattered across different platforms. This is specifically valid in case of mergers and acquisitions. Then consolidating data on a single platform is conducive for users and easy to maintain for SQL administrators.
- Secure Storage Environment: Security is a priority for any and all database and database security is ensured through protection rules and compliances. As per the survey conducted by National Institute of Standards and Technology, SQL server is most secure and least vulnerable database and hence the most preferred Storage environment.
Once the organization decides about migration, the Administrator has to analyze the challenges in moving the database from one platform to another. Following key challenges may create hindrance in smooth movement:
- SQL Database Corruption
Moving SQL Database from one server to another may lead to database corruption. - Database backup not update
Many times, when database gets corrupt and backups are also not up-to-date, then the administrator is unable to restore from backup. - Database backup not available
If backup is not implemented and the organization’s database gets corrupt then the chances of database recovery are next to nil unless the organization employs a reliable and performing software like Stellar Phoenix SQL Database Repair. - Cost involved in moving Database
Moving database from one Database Management System (DBMS) to another involves cost to be incurred in deploying a new server and the cost of data migration and the cost of old server which is rendered non-functional.
The downtime cost is also considered. Database will remain inaccessible during database migration from one server to another.
Methods to move SQL Server Database from one server to another
- Backup SQL Database and Restore to another server
The easiest solution is to take the latest backup of database and restore on another server. However, in most cases, SQL Admins and Backup Admins are different and there are chances that backup is not up-to-date. - Create a Duplicate Database in SQL Server
If the earlier database is using SQL database and you want to move database to a higher version, then one of the methods is to create a duplicate copy of database in SQL server. However, Admins need to have more than 100% free space. This is not a feasible option and may lead to corrupt SQL Database. - Move SQL Database to New Server
SQL Server Management Studio enables copying database from one server to another. To proceed further, you should get acquainted with: - Source Server
- Destination Server
- Use Windows Authentication
- Using SQL Server Authentication
- Go to Object Explorer and launch SQL Server Management Studio and connect with the Source Server
- Right click on the database to select the ‘Tasks’ option and select ‘Copy Database’ option ‘Copy Database Wizard’ screen displays.
- Fill in the details of Source Server and select the option ‘Use Windows Authentication’ followed by User ID and Password
- Next, fill in the details of Destination Server, and its Windows Authentication credentials
- Checkbox for ‘Use the SQL Management Object method’
- Select the Database from the available options and click on Copy option. Click Next to migrate SQL database to the destination server
- Verify MDF files and Log file path on the destination server
- Copy all other jobs. If the SQL Management Studio fails to copy jobs then opt for the following:
- System Event View
- Local Path
- Click on Windows Event Logs followed by Next button
- To schedule the SSIS page, Click on Run immediately
- Complete the Wizard message displays. Tick mark this option and click on Finish to complete the process.
- Stellar SQL Repair to copy SQL Server Database from one server to another
Deploying a trustworthy software to copy SQL Server Database. One such software is Stellar Phoenix SQL Database Repair software. This software allows users to repair a corrupt SQL server database. Once you have saved the repaired database as a New or Live database, then the next step is to deploy SQL Server Management Studio or SSMS. SSMS detaches the database from the source server and attaches it to the destination server.
Reasons to deploy Stellar software for SQL recovery before using manual method are:
- Database may get corrupt during migration. Stellar software repairs the corrupt MDF file and ensures smooth migration
- In case MDF files or any other associated file is not detached properly, then the SQL Database will not give appropriate results
Conclusion
Error-free Migration of SQL Server database is possible when the different files associated with SQL Database are properly detached from the Source server and attached with the Destination server. However, there are times, when Admins are unable to detach the files and if these files are not detached from the source location, there is low possibility of getting these attached at the destination. In such circumstances, the best solution is to repair the database using Stellar Phoenix SQL Database Repair, save it as New Database and then move this SQL server database from one server to another. By following this procedure, SQL Administrators can ensure error-free and smooth data migration.
Checkout the MVP’s feedback about Stellar Phoenix SQL Database Repair is available here.
About Rajan Singh
Rajan Singh is a Sr. Technology Consultant at Stellar Data Recovery Inc. and has published several article on MS Exchange emails, IOT, APIs, bug fixing etc.
Social Media Profiles
Google Plus: https://plus.google.com/101490924635563531512
About Rajan Singh
Rajan Singh is a Sr. Technology Consultant at Stellar Data Recovery Inc. and has published several article on MS Exchange emails, IOT, APIs, bug fixing etc.
Social Media Profiles
Google Plus: https://plus.google.com/101490924635563531512
Wednesday, June 13, 2018
Trouble in Opening MDF File because it Says SQL Error 5171? - A guest Post by Andre Williams
MS SQL Server is the most widely used and deployed database server in organizations. But, there are times when the SQL Server database gets corrupted due to various reasons. Error messages like SQL Error 1571 are also frequent with SQL Server. Let’s learn more about the SQL error 1571, its reasons and solutions.
Symptoms of SQL Error 5171:
With SQL Error 5171, you may face failures while logging in to SQL Server, restoring SQL database files, creating a tempdb database, and attaching MDF files successfully to the SQL Server database. Instead you will receive an error saying – “.mdf is not a primary database file. (Microsoft SQL server 5171)”

Possible Reasons for SQL Error 5171:
MDF file saves data in the form of pages, and each page occupies space of 8KB. The initial first page is the header page containing important database details such as signature, file size, compatibility, and much more. Rest all the other pages stores the actual data.
When the header page or related page of the file does not get recognized by the SQL Server database, it results in the SQL Error 1571 as the entire MDF is not considered to be a valid file.
Solution to Fix SQL Error 5171:
There are multiple reasons due to which SQL Error 5171 occurs. Some scenarios are mentioned below with their possible fix solution.
Scenario 1:
Usage of a mirror database in MS SQL Server by a user encounters the Error 5171, when database is set online by executing ALTER DATABASE command
Scenario 2:
When the SQL Server is upgraded to a latest or newer version, there are possible chances of Error 5171. As, you will have to first detach the database and then upgrade it to the new version. Hence, when you will try to attach it back to the MS SQL Server, it will fail to do so and error 5171 might encounter.
Below mentioned are the possible solutions for this error:
Method 1: For database mirroring
Step 1: First set, the principal database
Step 2: Use ALTER DATABASE MODIFY FILE command to modify the information.
Step 3: Now, stop the SQL server instance.
Step 4: Copy MDF and LDF files in a separate directory
Step 5: Now, restart SQL Server and attach the database files
Method 2: For attaching the database
Step 1: To troubleshoot the error, use the sp_attach_db command
Step 2: The command will attach the detached database files after upgrading is completed.
Please note: This method will work only in the case where you have used the sp_detach_db command to detach the database
Method 3: Automated Method to FIX SQL Server Error 5171
The above methods can easily remove the SQL Error 5171. However, if you still face the error after trying the above workaround methods, then you can opt for the automated solution. You can use Kernel for SQL Database Recovery tool, one of the most recommended methods by the database experts. The tool smoothly repairs and recovers all the database objects of corrupt or inaccessible MDF and NDF files. It flawlessly recovers large-sized MDF and NDF files.
Symptoms of SQL Error 5171:
With SQL Error 5171, you may face failures while logging in to SQL Server, restoring SQL database files, creating a tempdb database, and attaching MDF files successfully to the SQL Server database. Instead you will receive an error saying – “.mdf is not a primary database file. (Microsoft SQL server 5171)”
Possible Reasons for SQL Error 5171:
MDF file saves data in the form of pages, and each page occupies space of 8KB. The initial first page is the header page containing important database details such as signature, file size, compatibility, and much more. Rest all the other pages stores the actual data.
When the header page or related page of the file does not get recognized by the SQL Server database, it results in the SQL Error 1571 as the entire MDF is not considered to be a valid file.
Solution to Fix SQL Error 5171:
There are multiple reasons due to which SQL Error 5171 occurs. Some scenarios are mentioned below with their possible fix solution.
Scenario 1:
Usage of a mirror database in MS SQL Server by a user encounters the Error 5171, when database is set online by executing ALTER DATABASE command
Scenario 2:
When the SQL Server is upgraded to a latest or newer version, there are possible chances of Error 5171. As, you will have to first detach the database and then upgrade it to the new version. Hence, when you will try to attach it back to the MS SQL Server, it will fail to do so and error 5171 might encounter.
Below mentioned are the possible solutions for this error:
Method 1: For database mirroring
Step 1: First set, the principal database
Step 2: Use ALTER DATABASE MODIFY FILE command to modify the information.
Step 3: Now, stop the SQL server instance.
Step 4: Copy MDF and LDF files in a separate directory
Step 5: Now, restart SQL Server and attach the database files
Method 2: For attaching the database
Step 1: To troubleshoot the error, use the sp_attach_db command
Step 2: The command will attach the detached database files after upgrading is completed.
Please note: This method will work only in the case where you have used the sp_detach_db command to detach the database
Method 3: Automated Method to FIX SQL Server Error 5171
The above methods can easily remove the SQL Error 5171. However, if you still face the error after trying the above workaround methods, then you can opt for the automated solution. You can use Kernel for SQL Database Recovery tool, one of the most recommended methods by the database experts. The tool smoothly repairs and recovers all the database objects of corrupt or inaccessible MDF and NDF files. It flawlessly recovers large-sized MDF and NDF files.
Final Words:
You can always opt to use the manual methods for SQL recovery if you are an experienced database professional. But if you’re a naïve user of SQL database and you are not skilled enough to understand the errors of the database, then we suggest you restore your database files with the help of the automated solution.
Hope the solutions help you to resolve the issues related to MS SQL Server. If you have any queries, please mention in the comments. We will get back to you with a possible resolution.
About Andre Williams
Andre Williams, with more than three year's experience in SQL related technologies, contributes articles, blogs, and how-to tips regularly.
Social Media Profiles
Sunday, October 30, 2016
Using DBCC CLONEDATABASE to generate a schema and statistics only copy of a user database in SQL Server 2014 SP2
DBCC CLONEDATABASE is a new DBCC command introduced in SQL Server 2014 SP 2 which is used for creating the clone of a specified user database which helps in troubleshooting the performance issues related to the query optimizer.
When a clone of the database is created using DBCC CLONEDATABASE, it will create a schema and statistics only copy of the specified database and does not contain any copy of the data.
Creating the clone is as simple as passing the source database name and clone database name to the DBCC command.
Output of the DBCC Command

Once the cloning is completed, the cloned database will be in Read-Only mode.

When a clone of the database is created using DBCC CLONEDATABASE, it will create a schema and statistics only copy of the specified database and does not contain any copy of the data.
Creating the clone is as simple as passing the source database name and clone database name to the DBCC command.
DBCC CLONEDATABASE ('SansSQL', 'SansSQL_Clone')
Output of the DBCC Command
Once the cloning is completed, the cloned database will be in Read-Only mode.
SELECT name, database_id, is_read_only
FROM sys.databases
WHERE name in ('SansSQL', 'SansSQL_Clone')

It will start with few validations before the clone is created, The following validations are performed by DBCC CLONEDATABASE. The command fails if any of the validations fail.
- The source database must be a user database. Cloning of system databases (master, model, msdb, tempdb, distribution database etc.) isn't allowed.
- The source database must be online or readable.
- A database that uses the same name as the clone database must not already exist.
- The command isn't in a user transaction.
- Creating primary data file and log file
- Adding secondary dataspaces
- Adding secondary files
The destination database files will inherit the size and growth settings from the model database and the file names of the destination database will follow the source_file_name _underscore_random_number convention.
SELECT database_id, file_id, type_desc, name, physical_name
FROM sys.master_files
WHERE DB_NAME(database_id) in ('SansSQL', 'SansSQL_Clone')

Then the DBCC CLONEDATABASE will do a Internal Database Snapshot with the following steps
- Validate the source database
- Get S lock for the source database
- Create snapshot of the source database
- Create a clone database (this is an empty database which inherits from model)
- Get X lock for the clone database
- Copy the metadata to the clone database
- Release all DB locks
Using the below command, we can check if a database is a clone or a normal database.
SELECT DATABASEPROPERTYEX('SansSQL','isClone') AS SansSQL_DB_CloneStatus
      ,DATABASEPROPERTYEX('SansSQL_Clone','isClone') AS SansSQL_CloneDB_CloneStatus

Wednesday, October 5, 2016
SQL Backup Recovery Tool to Repair Damaged SQL Backup - Product Review - A guest Post by Daniel Jones
It has been commonly observed that many users are inclined to store the important and crucial data in SQL Server due to its reliable and consistent data storage feature. All the data is stored efficiently in data files i.e. MDF and NDF files. Unfavourable situations like server breakdown, system corruption etc can arise at any moment. The smart users prefer to take the backup of desired database, which can be restored during unexpected conditions. Many cases have been reported where the users are completely hopeless as their backup files (.bak) got damaged or corrupted due to reasons like virus attack or malware etc. No provision is provided by the server or operating system to recover data from such backup files. However, various third party tools promise to repair damaged SQL backup files without any data loss. One such well-known automated tool is SQL Backup Recovery Tool, which empowers to repair full database from corrupted/damaged backup file. Our data recovery experts have undergone through the software and tested it under the following environment:

Dual File Scan Mode
The tool has been designed to offer scanning of damaged backup files in the following two modes:


Preview Repaired SQL Data
Once the complete backup file is scanned, the tool provides preview of all repaired database components. The user can choose to preview all database component like tables, views, triggers, columns, functions, keys etc.


Multiple Export Options
The users are offered to export the repaired data in any of the following way:

Export Schema Options
SQL backup recovery tool provides two export modes for the users. Depending on requirement, the user can choose to export data as:

- Operating System- Windows 8
- Mounted RAM- 2 GB
- Processor Used-2.5 GHz
The testing has been done in such a way that all of its features can be evaluated to determine the SQL backup recovery tool on the basis of quality, reliability, performance, security etc. The following section is focused to provide a transparent review of the tool on the basis of expert’s experience.
Functional Features of SQL Backup Recovery Tool
While working with the recovery tool in different working environments, the experts encountered several amazing features which differentiates it from other tools available in industry. Some of the major features, which makes the tool excel in recovery field are mentioned below:
Complete Backup File Recovery
The tool facilitates the recovery of all MDF and NDF files from the corrupted backup file i.e., various database components such as tables, views, functions, triggers, keys, indexes get recovered from the chosen backup file.
Dual File Scan Mode
The tool has been designed to offer scanning of damaged backup files in the following two modes:
- Quick Scan - This mode scans the backup file with minimum corruption
- Advance Scan - This mode scans the backup file with major corruption issues (highly damaged files)
Multiple Backup File Recovery
SQL backup recovery tool provides Multiple Backup File Options to let the user add multiple backup files or folder for data recovery. So if user faces an issue where multiple backup files got corrupted, this multiple backup option can be chosen to recover all data.
SQL backup recovery tool provides Multiple Backup File Options to let the user add multiple backup files or folder for data recovery. So if user faces an issue where multiple backup files got corrupted, this multiple backup option can be chosen to recover all data.
Preview Repaired SQL Data
Once the complete backup file is scanned, the tool provides preview of all repaired database components. The user can choose to preview all database component like tables, views, triggers, columns, functions, keys etc.
Batch export Recovered Data
The tool allows the user to export selected database components from the scanned data. The user can make selective choice to transport the required database objects from the backup file.
The tool allows the user to export selected database components from the scanned data. The user can make selective choice to transport the required database objects from the backup file.
Multiple Export Options
The users are offered to export the repaired data in any of the following way:
- Export To SQL Server Database - It allows to export selected repaired data directly into SQL Server by providing database credentials.
- Export as SQL Server Compatible Script - It generates SQL script, which is compatible for any SQL Server version.
Export Schema Options
SQL backup recovery tool provides two export modes for the users. Depending on requirement, the user can choose to export data as:
- With only schema - It allows to export only with database schema for the backup file
- With schema & data - It allows to extract both data and schema for the backup file
Primary/Foreign Key Recovery
Along with the data recovery, the tool also helps to recover both primary and foreign keys of all the tables. So, we can say that the tool ensures to maintain data integrity of the data recovered from the backup file.
Perks of The Tool
In addition to above discussed features, the tool offers some additional features like auto-detection of SQL Server, no database size restriction, interactive user interface etc.
Specifications of SQL Backup Recovery Tool
The tool has been designed to work efficiently under the following hardware and software specifications:
Along with the data recovery, the tool also helps to recover both primary and foreign keys of all the tables. So, we can say that the tool ensures to maintain data integrity of the data recovered from the backup file.
Perks of The Tool
In addition to above discussed features, the tool offers some additional features like auto-detection of SQL Server, no database size restriction, interactive user interface etc.
Specifications of SQL Backup Recovery Tool
The tool has been designed to work efficiently under the following hardware and software specifications:
- Operating System - It supports Windows 8.1 & all below versions
- Processor Requirement - Minimum 1 GHz is mandatory for tool installation. The experts suggest to use 2.4 GHz processor for faster processing.
- Mounted RAM - 512MB should be allocated at minimum. For larger storage, 1 GB can be used depending on requirement.
- SQL Server - It repair damaged SQL backup file of SQL Server 2014 & all the below versions
Available Versions of SQL Backup Recovery Tool
The tool to repair damaged SQL backup file can be availed in two versions:
- Demo Version - Users can download the free version from company’s official website. It offers scan and preview of the backup files.
- Licensed Version - The paid version of the tool can be purchased from company’s website. It allows to scan, preview and export the selected backup file
PROS
- The tool provides recovery of backup files even without SQL Server installation on the system.
- The tool offers the recovery of highly corrupted backup files using advance scan.
CONS
- The generated scanned files cannot be saved on the local system, which creates need for rescanning in future use.
Conclusion
After working on various aspects of the software, we can conclude that SQL Backup Recovery tool fulfils all the expectations to repair damaged SQL backup file. The users can go for this tool for an efficient bak file recovery within few easy steps. The tool can be rated as 9.8 on the scale of 10 as it provides an excellent approach to repair the corrupted or damaged backup files using its interactive user interface.
About Daniel Jones
Daniel Jones is a SQL Server DBA and contributor at SQL Tech Tips. Having 2 + years of experience in SQL recovery and system infrastructure.
Social Media Profiles
Facebook: https://www.facebook.com/danieljones05
LinkedIn: https://www.linkedin.com/in/daniel-jones-5bb87a115
Social Media Profiles
Facebook: https://www.facebook.com/danieljones05
LinkedIn: https://www.linkedin.com/in/daniel-jones-5bb87a115
Thursday, February 18, 2016
Configuring AlwaysOn Availability Groups - Part 2
In my previous post we have learnt on how to configure the failover clustering. This is the first step and an important pre-requisite in configuring AlwaysOn Availability Groups.
In this post we will learn how to Enable and Configure the AlwaysOn Availability Groups using SQL Server 2016.
Before we start configuring the AlwaysOn, we need to enable this Feature.
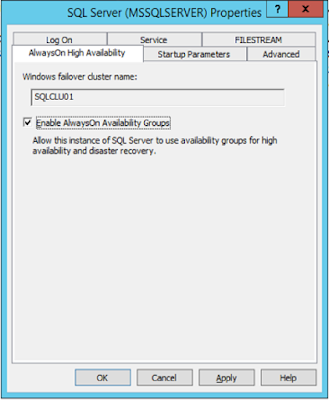
Open "SQL Server configuration Manager"
In this post we will learn how to Enable and Configure the AlwaysOn Availability Groups using SQL Server 2016.
Before we start configuring the AlwaysOn, we need to enable this Feature.
Open "SQL Server configuration Manager"
Right-Click on “SQL Server” Service and click on
“Properties”
Go to “AlwaysOn High Availability” Tab and Check the box
“Enable AlwaysOn Availability Groups” and Click OK.
To Create new Availability Group
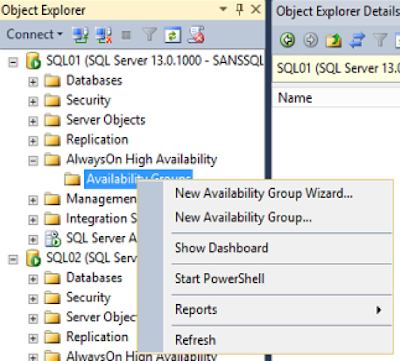
Open SSMS and connect to the SQL DB Engine.
Expand “AlwaysOn High Availability”
Right-Click on “Availability Groups” and click on “New
Availability Group Wizard”
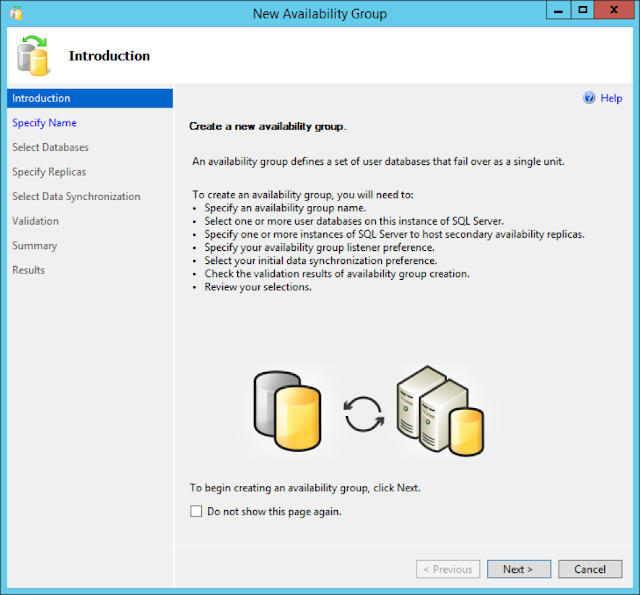
This is will open up the New Availability Group Wizard
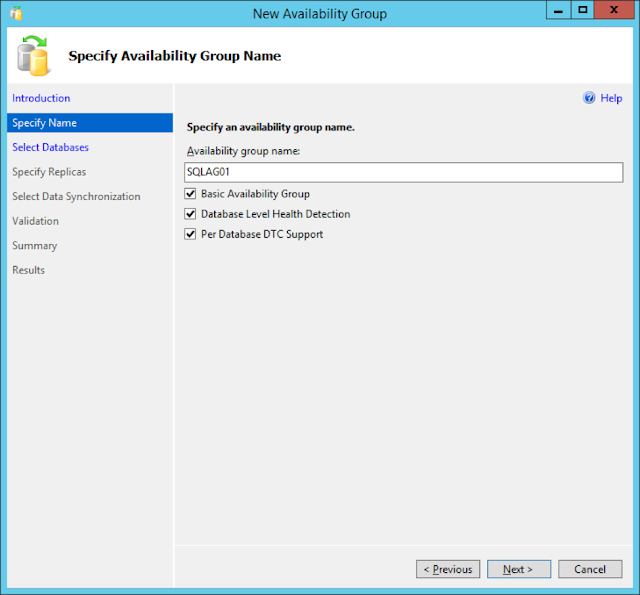
Give a name to the Availability Group and choose the required options and click Next.
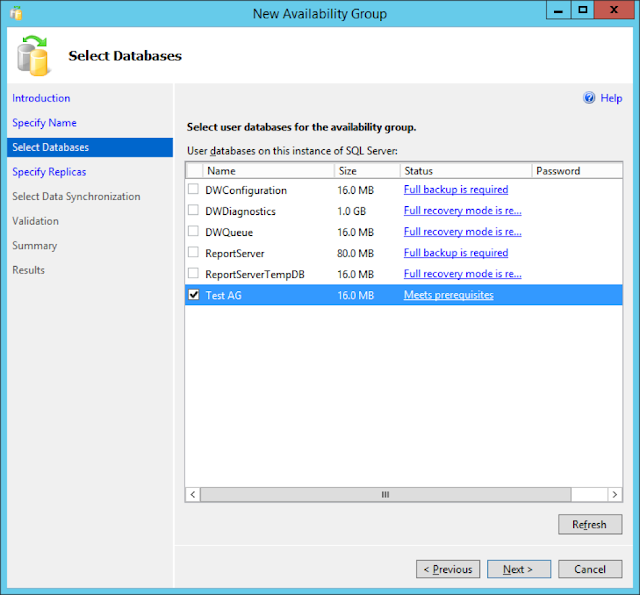
In this page, choose the databases that you may want to be part of this Availability Group.
Additional Databases can be added later as well.
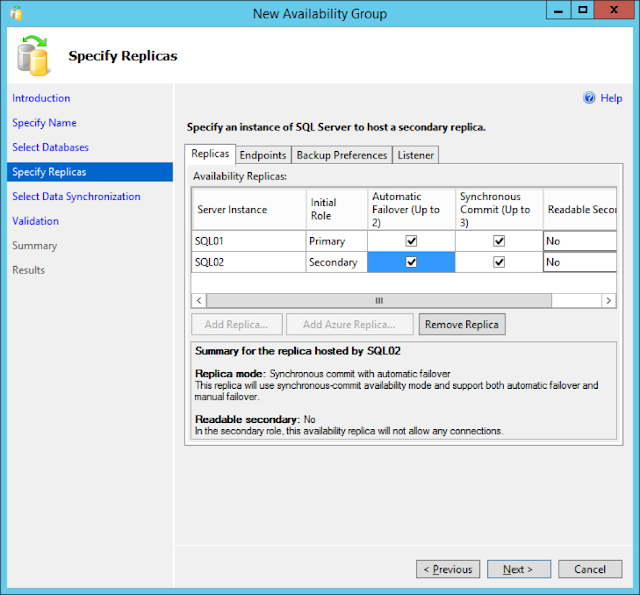
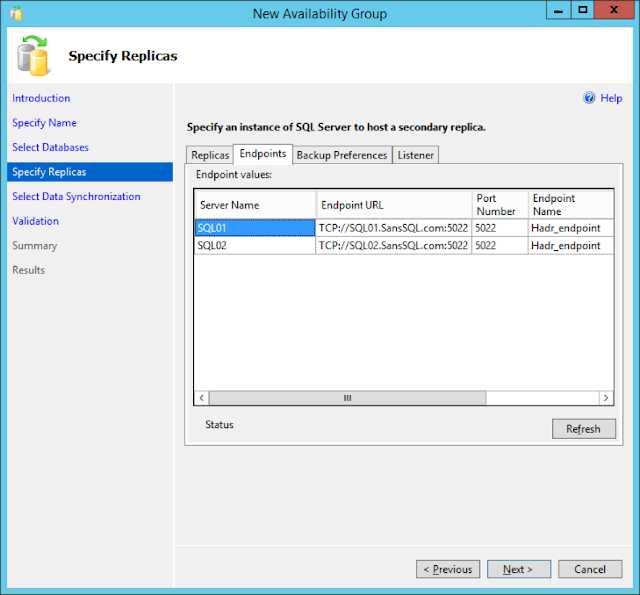
In the next page, Add the Replica SQL Server instances and configure Endpoints, Backup Preferences and Listener for this Availability Group
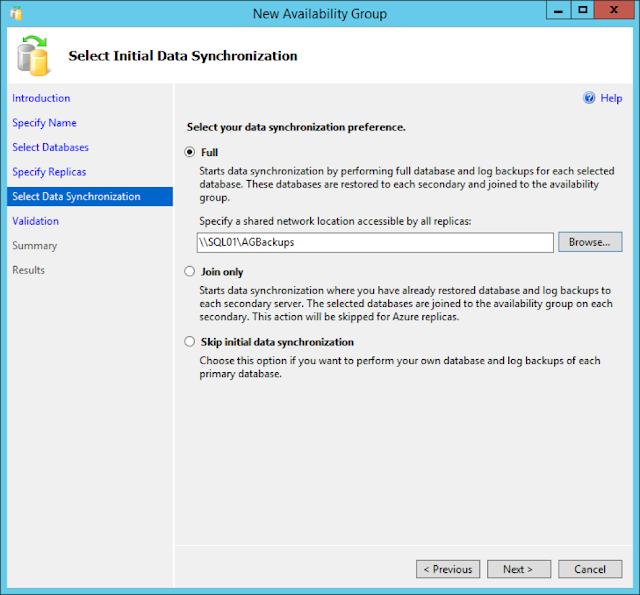
In the next page, specify the Synchronization preference.
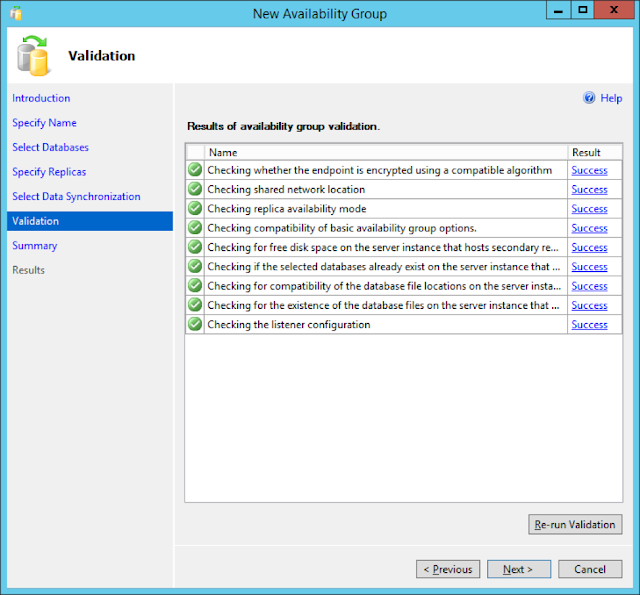
In the next step, the wizard will validate the configurations done so far
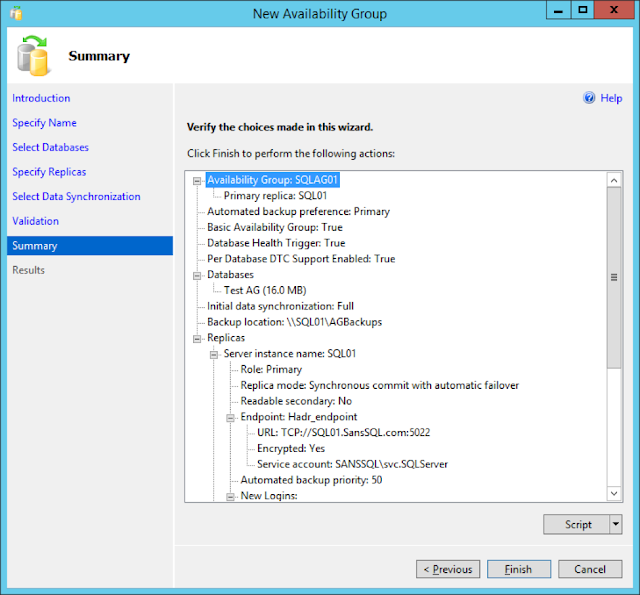
Review the Summary page and Click Finish to start the Availability Group Configuration
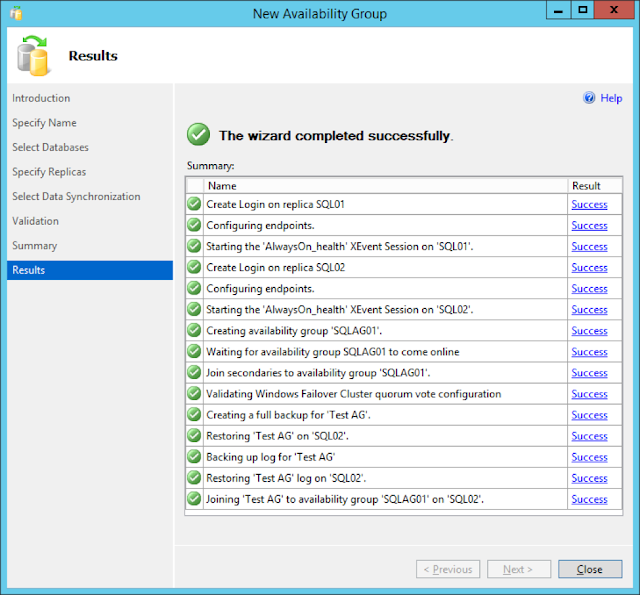
Successful completion of this wizard will create the new Availability Group with the specified databases, endpoints and the listener.
Subscribe to:
Posts (Atom)