SansSQL: Business Intelligence

Saturday, November 15, 2014

Import data from SharePoint Online

It's all cloud could and cloud now-a-days. Everyone are moving towards the cloud for making life easier.
In this post I will be explaining on how to extract/Import data from SharePoint Lists which is hosted on SharePoint Online of Office 365 using SSIS.
There is no direct way to connect to the SharePoint Online using SSIS.
For connecting to SharePoint Online using SSIS, we need the below components installed before stating.
  1. Microsoft OData Source for Microsoft SQL Server 2012
    Download from http://www.microsoft.com/en-in/download/details.aspx?id=42280
  2. SharePoint Server 2013 Client Components SDK
    Download from http://www.microsoft.com/en-in/download/details.aspx?id=35585 
Microsoft OData Source for Microsoft SQL Server 2012 is the SSIS component which we use as source connection to the Sharepoint Online Lists and SharePoint Server 2013 Client Components SDK allows us to connect to Sharepoint Online.

Once you download and Install both the components, 
  1. Open the Visual Studio and create a new Integration Services Package
  2. Drag and Drop "Data Flow Task"
  3. In the "Data Flow Task" Drag and Drop "OData Source"
  4. Right-Click on "OData Source" and Click Edit
  5. Enter the "Connection Manager Name" and "Service Document Location" For Service Document Location, append "/_vti_bin/listdata.svc" to the SharePoint site
    For Office 365, we need to use "User this user name and password"
  6. Click "All" and change the "Microsoft Online Services Authentication" to True
  7. Click "Test Connection"
  8. Click "OK"
  9. Then Choose "Collection" in "User Collection or resource path"
  10. In the "Collection" choose the list you want to import
  11. When you click on "Preview..." you will be able to see the data from the list
  12. Now add the destination connection and run the package to import data from the SharePoint Online list

Monday, November 25, 2013

Change SSAS Deployment mode from multidimensional to tabular mode without reinstalling Analysis Services

It so happens that sometimes minds change easily and things needs to be done without reinstalling.
One such case is changing the Deployment mode of SSAS from multidimensional to tabular mode in SQL Server 2012.
To change the deployment mode
  • Backup the multidimensional Analysis services databases on the instance (if any)
  • Detach the multidimensional Analysis services databases from the instance (if any). These databases will not be usable in tabular mode
  • Navigate to the path "<Install Location>:\Program Files\Microsoft SQL Server\MSAS11.MSSQLSERVER\OLAP\Config" and backup the file "msmdsrv.ini"
  • Open the file "msmdsrv.ini" and change the value of DeploymentMode to 2.
    0 - Multidimensional
    1 - SharePoint
    2 - Tabular
  • Re-Start the SQL Server Analysis services 
SSAS multidimensional mode - Before Change

SSAS tabular mode - After Change

Sunday, August 14, 2011

Looping through SQL Servers using SSIS or Dynamically build connection to multiple SQL Servers

Consider you are giver a task of gathering information from multiple servers. What are the different ways you can automate this?
  1. Create linked servers in each server pointing to your central repository
  2. Create Separate SSIS package in each servers which loads data to your central repository
  3. Create one SSIS package with multiple data sources and duplicate the tasks for each data source.
  4. Create one SSIS package which dynamically builds connection to each server and does the data loading tasks.
If you choose an option between 1 and 3 , then  you will have to do some extra work for gathering the server information when there are new servers added to your environment.
If you choose the 4th option then also you will have some extra work but it is very small and easy when compared to the first 3 options. Here you need to just add the new Server Names to the table and that is all and everything else will be taken care by the SSIS package.
In this post I am going to explain how to create a SSIS package which loops through multiple SQL server and gathers information  by building the connection to those servers dynamically.
  1. Open “Microsoft Visual Studio”
  2. Create a new “Integration Services Project”
  3. Create a SSIS Package
  4. Create 2 Connection Managers, 1 for the source (which will be set dynamically for each iteration of the loop)  and the other for destination (which will remain constant, in other terms your Central Repository)
  5. Store All your Server Names in a table preferably in the Central Repository (Destination Connection)
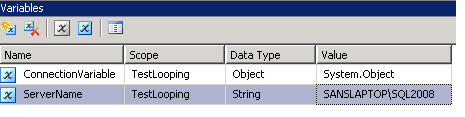
  6. Add 2 variables
  7.     a. Name: ConnectionVariable (A name of your choice)
            Scope: Package
            Type: Object
            Value: System.Object
        b. Name: ServerName  (A name of your choice)
            Scope: Package
            Type: String
            Value: A Valid Server Name

  8. Add an "Execute SQL Task" with SQL Statement like "select FullName from dba..tbl_ListOfServers".
  9. Set the result set to Full Result Set.
  10. On the Result Set page, Add a Result 
  11. Set Result Name "0" and assign it to your Object variable (In our case it is “ConnectionVariable”).
  12. Now add a “Foreach Loop Container” 
  13. Connect it from the “Execute SQL Task”
  14. Inside the “Foreach Loop Container” , add the required “Data Flow Task”
  15. Now Right-Click on the “Foreach Loop Container” and click on “Edit”
  16. Now Go to “Collection” page and Set “Enumerator” to “Foreach ADO Enumerator” and “Enumerator Configuration ” to the Object Variable(In Our Case “ConnectionVariable”) and Set “Enumeration Mode” to “Rows in the First Table”
  17. Now go to the “Variable Mapping” page and Choose the “String Variable” (In our case it is “ServerName”) and set the Index=0
  18. Now, in the “Data Flow Task” add a “OLE DB Source” (Dynamic Connection) and connect it down to a “OLE DB Destination” (which will be your Central Repository).
  19. Now Select the Source Connection Manager (In Our Case it is “Source”) and Right-Click on this Source and choose “Properties”.
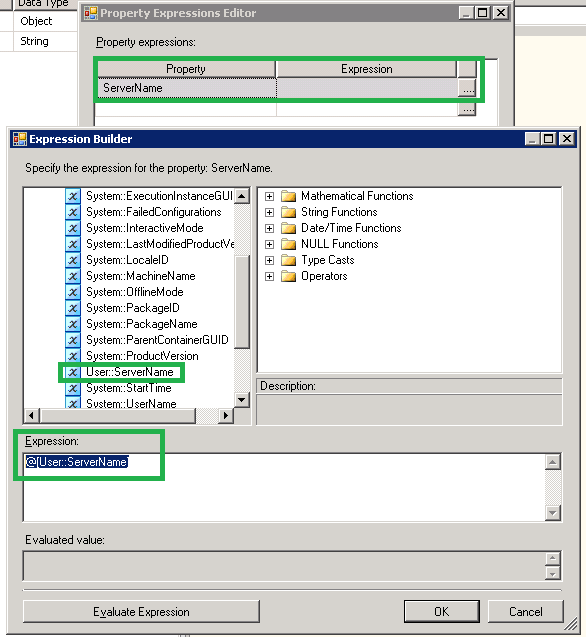
  20. Expand the “Expressions” Option and click on the browse button (…)
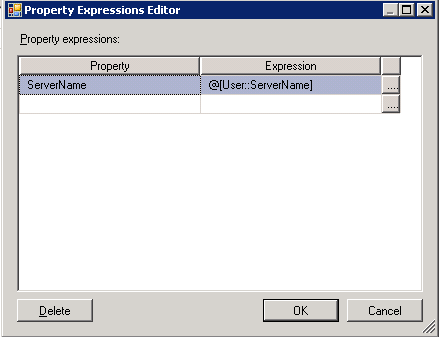
  21. Now in the “Property Expression Editor”, Choose the property “ServerName” and click on browse button (…). Now choose the String Variable (in our case “ServerName”) and Drag and Drop this variable into the “Expression” box and click “OK” and “OK”.


Now when the package runs, the “Execute SQL Task” will read the list of servers and stored in the table you specified and the “Foreach loop” will iterate over each record in that table, running the “Data Flow Task” each time while each time, the ServerName property of the Source Connection in the data flow will get a new value.

This article is also available in pdf format for downloading.
Please Click here to get your copy.

Friday, January 21, 2011

SSRS Error - An Unexpected Error occurred in Report Processing (rsInternalError)

I was working on a SQL Server Reporting Services (SSRS) Report just a few minutes back and i thought my deployment of the report went fine and i can now view my deployed reports on the Report Manager site.
Assuming that everything went fine, I opened the Report Manager and there was a surprise awaiting for me.
And the surprise was, the Report Manager which was working fine till yesterday is now giving an error.
The error is:
An Unexpected Error occurred in Report Processing (rsInternalError)
Could not find a part of the path 'C:\Documents and Settings\SANSLAPTOP\ASPNET.SANSLAPTOP.000\Local Settings\Temp\brhx7gi1.tmp


Fix that worked for me
:
I manually went into each folder structure that is displayed as part of the error message and found that in my case, the folder "Temp"  was missing in the file system.
I created this folder and went back to my report manager and refreshed the page and the report manager started to work as before.

Sunday, November 15, 2009

How to Backup Analysis Service Database

An Analysis Service database can be backed up using SSMS or XMLA Query Editor.
Backup using SSMS:
1. Login to SSAS instance using SSMS
2. Right-Click on the Analysis service database you want to backup.
3. And Choose the option Backup.
4. Now in the Backup Database page, Enter the location to where you want the backup file to be placed.
5. Choose the other options, if required.
6. And Click on OK to backup the database.
Backup Using XMLA Query Editor:
1. Open the XMLA Query Editor using the New Query Option.
2. Enter the below query.
 <Backup xmlns="http://schemas.microsoft.com/analysisservices/2003/engine"> 
   <Object>
     <DatabaseID>Test</DatabaseID>
   </Object>
   <File>E:\Test.abf</File>
   <AllowOverwrite>true</AllowOverwrite>
 </Backup>
3. Replace the DatabasesID with the Analysis Service database name which you want to backup.
4. And replace the File to where(location on disk) you want the analysis service database to be backed up to.
5. Execute the Query.

Wednesday, December 10, 2008

Add a logo to the Report Manager

Everyone wants to put their custom logo to the Report Manager. Here is how it can be achieved.

You just need to change the below code for .msrs-uppertitle in the ReportingServices.css file which is located at
C:\Program Files\Microsoft SQL Server\MSSQL.3\Reporting Services\ReportManager\Styles

Note : Before doing this please backup the ReportingServices.css file for safety.

Put the below code under .msrs-uppertitle and you will be able to see your custom logo on the report Manager.

.msrs-uppertitle
{
BACKGROUND: url(Image Location) no-repeat;
HEIGHT: 35px;
WIDTH: 120px;
TEXT-INDENT: -5000px;
}

Friday, October 10, 2008

SQL 2005 SSIS and Excel 2007

Most of us know how to use an Office Excel file in an SSIS package. As long as we use an Excel file with the .xls extension it would be fine. But, when it comes to Office Excel 2007 it would be a bit different. The Connection manager for Excel files option that we usually choose will not work.

Since Office Excel 2007 and its .xlsx extension came after a long time after SQL Server 2005 release and since this new format is entirely different from the previous formats we have a little problem in using Connection manager for Excel files option with Excel 2007.This was sorted out with the Service Pack 2. This Service Pack gave us a new driver which could be used for Office Excel 2007 files.
Here are the brief steps on how to create a connection manager for Excel 2007.
In a new or existing package,

1. Add a New Connection and choose the connection manager type either ADO.NET or OLEDB by right-clicking on the Connection Managers tab.

2. Click on New and under the Provider drop-down list, select Microsoft Office 12.0 Access Database Engine OLE DB Provider

3. Click OK

4. Click on “All” which is located on the left side of the connection manager window, and type “Excel 12.0” against the Extended Properties.

5. Now go back to the Connections tab and type in the file path of the Excel 2007 file along with the file name there.


6. Click OK and you are done.
7. The same can be used for Access database 2007.

Ads