SansSQL: SSMS

Monday, August 27, 2012

Fix SSMS Error - The automatically saved settings file ‘\\Settings\CurrentSettings-YYYY-MM-DD.vssettings’ cannot be found.

When you try to Open or Close SQL Server Management Studio after an upgrade or fresh installation of SQL Server 2008 R2 you might get the below error which states,
The automatically saved settings file '\\Settings\CurrentSettings-YYYY-MM-DD.vssettings' cannot be found. You can change this file on the 'Import and Export Settings' Tools Options page. The IDE will use your most recent  settings file for this session.


However there is no option "Import and Export Settings" in SQL Server Management Studio.
So to Fix this error,
  1. Open Registry Editor
  2. Navigate to the location HKEY_CURRENT_USER\Software\Microsoft\Microsoft SQL Server\100\Tools\Shell
  3. Edit the value of the Reg Key "VisualStudioLocation" to  %USERPROFILE%\Documents\SQL Server Management Studio
  4. Close Registry Editor
Now when you open or close SQL Server Management Studio, You will not get the error.

Friday, March 23, 2012

Different ways to check your SQL Server(s) Authentication mode

Checking the Authentication mode using T-SQL:
  1. Using "xp_LoginConfig" extended Stored Procedure
    EXEC Master.dbo.xp_LoginConfig 'login mode'
    

  2. Using "SERVERPROPERTY" Function
    SELECT CASE SERVERPROPERTY('IsIntegratedSecurityOnly')   
    WHEN 1 THEN 'Windows Authentication mode'   
    WHEN 0 THEN 'SQL Server and Windows Authentication mode'   
    END as [Authentication Mode]  
    
    
  3. Using Registry
    DECLARE @Mode INT  
    EXEC master.dbo.xp_instance_regread N'HKEY_LOCAL_MACHINE', 
    N'Software\Microsoft\MSSQLServer\MSSQLServer',   
    N'LoginMode', @Mode OUTPUT  
    
    SELECT CASE @Mode    
    WHEN 1 THEN 'Windows Authentication mode'
    WHEN 2 THEN 'SQL Server and Windows Authentication mode'
    ELSE 'Not known'
    END as [Authentication Mode]  
    
Checking the Authentication mode using SSMS:
To check the Authentication mode using SSMS,
  1. Right-Click on the Server
  2. Choose "Properties"
  3. Navigate to "Security" Page
  4. Check "Server Authentication" Section

Thursday, September 1, 2011

Denali CTP 3 - Show\Hide Results Pane keyboard shortcut not working - Ctrl+R not working

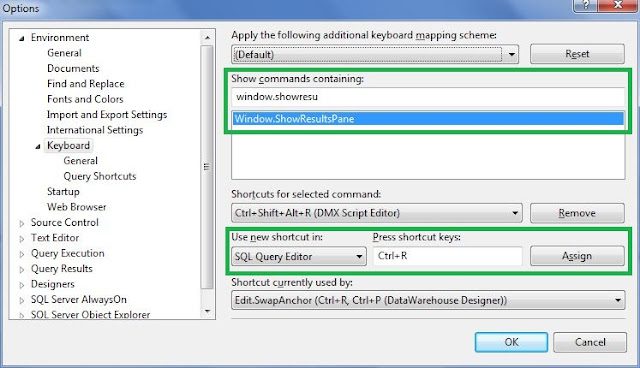
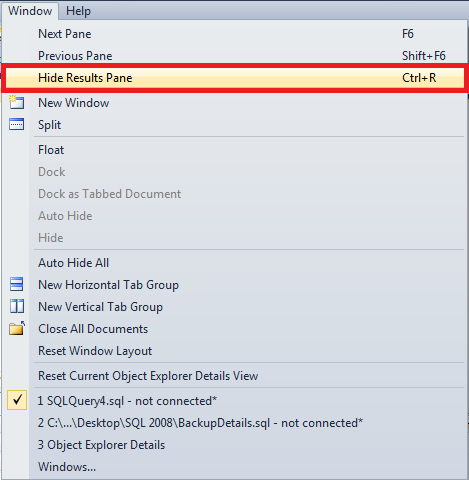
Recently I installed Denali CTP 3 version and was writing a code which is coming next in this blog. During that time I attempted to hide the results pane using the keyboard shortcut Ctrl+R and was surprised that the keyboard shortcut Ctrl+R was not working. When I investigated further I found that that the keyboard shortcut was not assigned to the command "Hide Results Pane".
To fix this issue or to assign the keyboard shortcut to the command "Hide Results Pane", follow the below steps.
  1. In a SSMS window, go to "Tools" menu and choose "Options".
  2. In the left pane of "Options" window, expand "Environment" and then click on "Keyboard".
  3. In the right pane, Search for the command "Window.ShowResultsPane" Under "Show Commands Containing:" section and select that command
  4. Now, Under "Shortcuts for selected command:" section choose "SQL Query Editor" from the dropdown list of "Use new shortcut in:" sub-section.
  5. In the "Press shortcut keys:" sub-section place the cursor and press the keys "Ctrl" followed by "R" 
  6. Click on "Assign" button and click "OK" to exit the "Options" menu and start using the keyboard shortcut "Ctrl+R" to Hide\Show Results Pane. 


Friday, January 21, 2011

Configuring Database Mail

Database Mail in SQL Server 2005 and up is the replacement of the SQL Mail that existed in SQL Server 2000. Database Mail is more enhanced than SQL mail and does not require a MAPI mail client like outlook or outlook express installed on the system for it to work.

Here is the procedure to setup or configure the Database mail.
  1. Enable Database Mail XPs
    EXEC SP_CONFIGURE 'show advanced options',1
    GO
    RECONFIGURE

    EXEC SP_CONFIGURE 'Database Mail XPs',1
    GO
    RECONFIGURE
  2. Expand the "Management" Folder under your server. Right-Click on the "Database Mail" and Choose "Configure Database Mail"
  3. This will open up the Database Mail Configuration Wizard.
    Now in the welcome page, click "Next" and in the "Select Configuration Task" Page choose the option "Setup Database Mail by performing the following tasks" and click "Next"
  4. Now in the next page "New Profile" the wizard gives you the option to create your mail profile and Add accounts to this profile. Fill in the Mail profile details and click on "Add" button to add the Mail accounts.
  5. In the "New Database Mail Account" page, fill in the Account Name, Description, Email Address, Display Name, Reply e-mail, Exchange Server Name and its Port Number. By default the port number will be 25. If it is different for your exchange server, then you have to mention that port number here.
    Then Specify the SMTP Authentication and click "OK"
  6. Click "Next" in the resulting Page
  7. In the "Manage Profile Security" page, select the appropriate security for your profile.
    Profiles are either Public or Private. A Private Profile is accessible only to specific Users or Roles. A Public Profile allows any Users or Roles with access to msdb database to send e-mail using that profile.


  8. In the next Screen, you can configure the System Properties.
  9. After configuring the System Parameters, click "Next". In the Summary Page, the wizard will display what actions will be performed. If you are satisfied then click "Finish" else Click "Back" button and do the changes as required.
     

  10. Now Send a Test E-mail. Right-Click on "Database Mail" and Choose "Send Test E-Mail..."
    Now in the resulting Screen, select the "Mail Profile", enter the "To" E-Mail Address, Subject and Body and then Click on "Send Test E-Mail".


    You can also send e-mail by using the SP sp_send_dbmail which will be present in the msdb database.
    Exec msdb..sp_send_dbmail
          @profile_name='DBA'
          ,@recipients='segu.sandesh@gmail.com'
          ,@Subject='Test Email'
          ,@Body='Test Email from my Laptop'
       

This article is also available in pdf format for downloading.
Please Click here to get your copy.

Saturday, January 8, 2011

How to clear most recently used (MRU) servers list

As the days move with your work on SQL Server management studio, it will accumulate the list of servers that you have been working on, starting from the point of installation of  SQL Server management studio.
This list is called as MRU servers list. Here MRU refers to Most Recently Used.
This makes your life easier by showing the most recently used servers by you and you can just select one from the list instead of remembering the server name and typing it manually.


As the list becomes big or the servers that you were using are no more used by you or for any other reasons you may want to clean up this list, Here is the process on how to clear the MRU servers list.

For SQL Server 2005
  1. Make sure that the "SQL Server management studio" is not opened
  2. Go to "Run"
  3. Type this command %APPDATA%\Microsoft\Microsoft SQL Server\90\Tools\Shell\ and click "ok". This will open up the folder where this list is stored
  4. Now search for the file "mru.dat" and rename this file.
  5. After renaming, launch the SQL Server management studio and you will not see any of the most recently used servers in the list.

For SQL Server 2008
  1. Make sure that the "SQL Server management studio" is not opened
  2. Go to "Run"
  3. Type this command %APPDATA%\Microsoft\Microsoft SQL Server\100\Tools\Shell\ and click "ok". This will open up the folder where this list is stored
  4. Now search for the file "SqlStudio.bin" and rename this file.
  5. After renaming, launch the SQL Server management studio and you will not see any of the most recently used servers in the list.

Ads